LED installations, especially in bathrooms, such as when installing a vanity LED light kit, often encounter wiring issues that lead to flickering lights, uneven brightness, or safety risks. Common mistakes include using mismatched power supplies, incorrect wire gauges, or improper IP-rated components. Here’s what you need to know for a safe and efficient setup:
- Voltage Matters: Choose 12V or 24V DC for wet zones; reserve 120V AC for dry areas.
- IP Ratings: Use IP65+ components in damp spaces; IPX7 is mandatory for submerged areas.
- GFCI Protection: Required for all bathroom circuits to prevent electrical hazards.
- Avoid Voltage Drop: Use thicker wires or switch to a 24V system for longer runs.
- Driver Placement: Keep drivers accessible and ventilated for maintenance.
For tasks involving 120V wiring, always consult a licensed electrician. Proper planning and adhering to safety guidelines ensure your LED setup is functional and long-lasting.
Why Your LED Installation Isn’t Working & How To Fix It
If you are just starting your project, follow our guide on how to install the shower niche lighting kit to ensure a correct setup from the beginning.
sbb-itb-6294289
Core Safety Rules for Bathroom LED Wiring
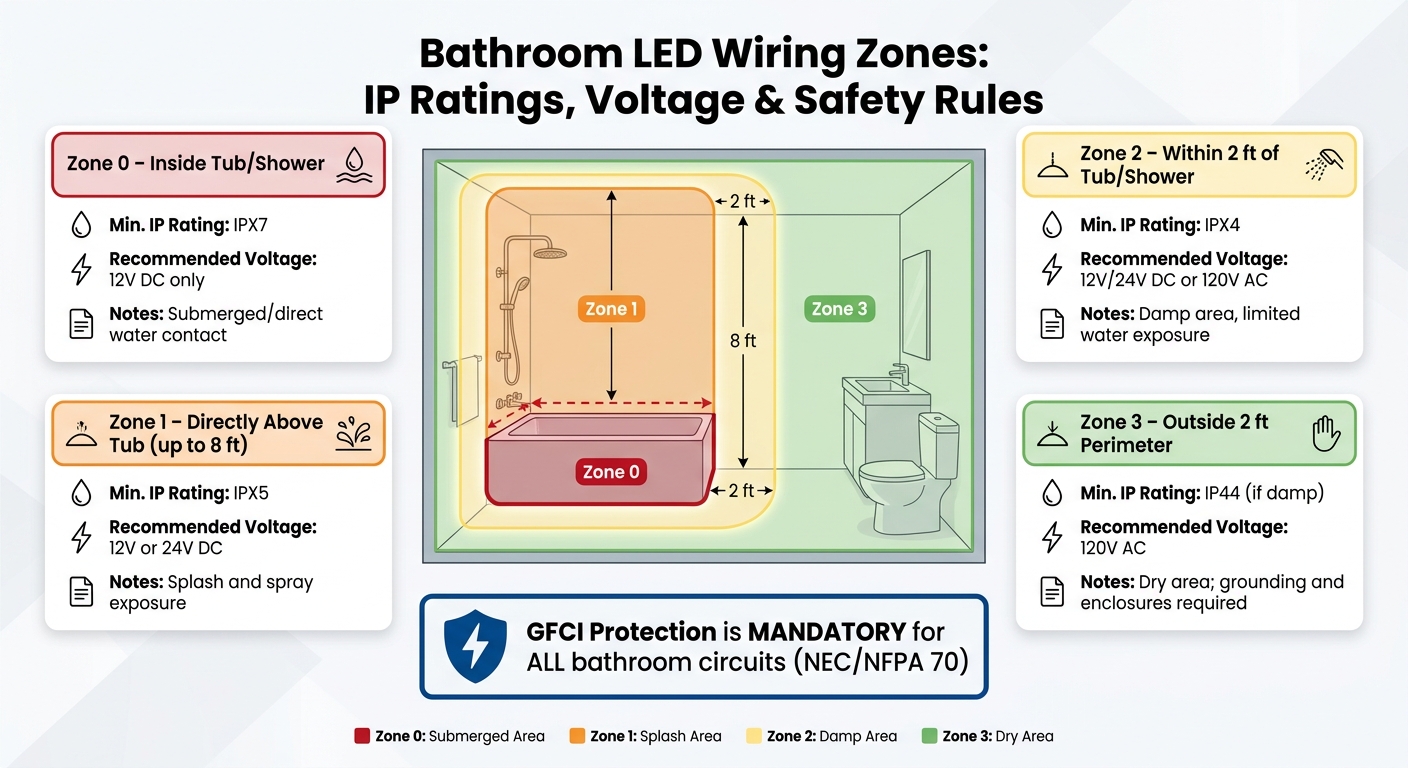
Bathroom LED Wiring Zones: IP Ratings, Voltage & Safety Rules
Before starting any installation, it’s crucial to understand the U.S. bathroom electrical codes. All electrical work in bathrooms must adhere to the National Electrical Code (NEC), NFPA 70. Failing to follow these guidelines not only violates regulations but also poses serious safety risks. Every decision you make during wiring impacts both the safety and performance of your LED setup.
Low Voltage vs. Line Voltage: What You Need to Know
One of the biggest choices you’ll face is deciding between low-voltage (12V or 24V DC) and line-voltage (120V AC) systems. The best option depends on the location of the lights within the bathroom.
Bathrooms are divided into zones based on their distance from water, and each zone has specific requirements:
| Zone | Location | Min. IP Rating | Recommended Voltage |
|---|---|---|---|
| Zone 0 | Inside tub/shower | IPX7 | 12V DC |
| Zone 1 | Directly above tub (up to 8 ft) | IPX5 | 12V/24V DC |
| Zone 2 | Within 2 ft of tub/shower | IPX4 | 12V/24V or 120V AC |
| Zone 3 | Outside 2 ft perimeter | IP44 (if damp) | 120V AC |
For areas with direct water exposure, low voltage is the safest choice. For example, Zone 0 – inside a tub or shower – requires 12V DC systems only. On the other hand, line voltage (120V) is typically used in Zone 3 for ceiling fixtures and other dry areas, where additional grounding and protective enclosures are necessary. Be sure your circuit protection aligns with the voltage requirements of each zone.
GFCI Protection and Grounding
GFCI (Ground Fault Circuit Interrupter) protection is mandatory for all bathroom circuits. These devices monitor the flow of electricity and immediately shut off power if they detect an imbalance, such as when electricity comes into contact with water or a person.
"Ground-fault protection remains one of the most effective safeguards in residential wet locations." – National Electrical Manufacturers Association (NEMA)
For 120V systems, grounding is equally essential. All metal LED fixtures must be properly grounded to safely channel stray currents. Use a multimeter to confirm grounding continuity. Additionally, replace GFCI outlets that are more than 10 years old, as they can degrade and may fail to trip when needed. After installation, test the GFCI function to ensure it cuts power instantly. Finally, ensure all components exposed to moisture meet waterproofing requirements.
Using Waterproof Components in Wet Areas
IP ratings are non-negotiable in bathrooms – they’re the baseline for safety. In areas near tubs or showers, components must be rated IP65 or higher for wet locations. Anything installed inside the shower must meet at least IPX7 standards for immersion protection.
Using purpose-built products makes a significant difference. For example, Thunder Bunny released updated waterproof LED kits in March 2026, designed for floating vanities and shower niches. These kits feature 24V DC systems with IP-rated COB (Chip on Board) LED strips, which meet wet-location safety standards while providing high-density, dot-free lighting. However, it’s not just about the LED strips – every component, including connectors, junction boxes, and switches, must meet the required IP rating for its zone. Pairing a waterproof LED strip with an unrated connector creates a weak link that compromises safety.
Common Wiring Mistakes and How to Fix Them
Even with careful planning, wiring mistakes can happen during a shower niche lighting installation. The most common culprits? Using the wrong power supply, creating poor connections, or selecting wires that are too thin for the job.
Mismatched Power Supplies and Overloaded Drivers
One of the quickest ways to damage an LED strip is by using a mismatched power supply. For instance, connecting a 12V LED strip to a 24V driver can lead to overheating or complete failure. On the other hand, using a 12V supply on a 24V strip will likely result in dim or non-functional lights. To avoid these issues, always check your power supply’s output using a multimeter before making any connections.
Driver overloading is another common issue. To prevent this, calculate the total wattage required by multiplying the strip’s power consumption per foot by the run length. Then, add a safety margin of at least 20%.
"Always select a unit that exceeds the total calculated wattage by at least 20–30% for safety." – HitLights
Here’s a quick reference table for power supply recommendations based on typical strip types for a 16-foot run (about 5 meters), with extra capacity already included:
| Strip Type | Typical W/ft | 16‑ft Run Requirement | Recommended PSU |
|---|---|---|---|
| 2835 (60 LED/m) | ~1.5W | ~24W | 30W |
| 2835 (120 LED/m) | ~2.9W | ~48W | 60W |
| 5050 (60 LED/m) | ~4.4W | ~72W | 90W |
| COB (528 LED/m) | ~3.7–4.9W | ~60–80W | 100W |
If you notice flickering lights, buzzing noises, excessive heat, or sections of the strip failing to light up, it’s likely your driver is overloaded. In such cases, recalculate your load and switch to a properly rated driver.
Reversed Polarity and Loose Connections
Once your power supply is sorted, the next step is to check the connections. If your LED strip doesn’t light up, it might be due to reversed polarity. Most LED strips have polarity markings on the copper pads – double-check these to ensure the positive (+) and negative (−) wires are connected correctly.
Loose connections can also cause headaches, leading to flickering lights or sections of the strip not working at all. These issues are often traced back to improperly seated solderless connectors or cold solder joints.
"A cold solder joint occurs when the solder does not fully melt, preventing proper bonding. This results in unreliable power transfer or short circuits." – Jessan Buenafe, LED Supplier News Author
To fix cold solder joints, reheat them until the solder flows smoothly, creating a shiny and solid connection. For solderless connectors, make sure they click securely into place. Adding heat shrink tubing or mechanical strain relief at connection points can also help prevent failures caused by thermal expansion and contraction.
Voltage Drop from Undersized Wire Gauge
Wire gauge plays a critical role in preventing voltage drop, which happens when resistance in the wire reduces voltage over longer runs. To avoid this, use the following guidelines:
- 18 AWG for runs under 10 feet
- 16 AWG for runs between 10 and 20 feet
- 14 AWG for runs between 20 and 35 feet
For runs longer than 16 feet, consider switching from a 12V to a 24V system. A 24V system draws less current, which reduces voltage drop – at 12V, the drop is typically twice as severe for the same wattage.
If upgrading to thicker wires doesn’t solve the problem, you might need to rethink your wiring layout. For longer runs, using home-run wiring or feeding power from the center of the strip can help minimize voltage drop.
Planning Your LED Layout for Easy Access
Fixing wiring mistakes after installation can be a real headache. That’s why taking the time to plan your LED layout now can save you from future repairs and ensure everything runs smoothly. Before buying any components, map out your entire wiring plan. Decide where the LED strips will be placed, figure out the best spots for the drivers, and think about how you’ll access everything if something needs fixing later.
Grouping Circuits by Function
Organizing LED circuits by function offers better control and simplifies troubleshooting. For instance, you could keep your shower niche lights on one circuit, your floating vanity LEDs on another, and your toe-kick lighting on a third. This setup gives you the flexibility to dim or switch each zone independently. Plus, if an issue arises in one area, you can isolate it without disrupting the rest of the system.
To make things even easier, distribute the electrical load across multiple power supplies and label all wires right away. Using parallel wiring to connect multiple LED strips to a driver ensures consistent voltage for each section. This way, if one segment fails, it won’t affect the entire run. Lastly, make sure your drivers are placed in accessible locations to complete your setup.
Placing Drivers Where You Can Reach Them
Organizing circuits is only part of the equation – driver placement is equally critical for easy maintenance. Avoid hiding drivers in tight or hard-to-reach spaces. Instead, position them somewhere accessible, like inside a vanity cabinet, a linen closet, or even an adjacent room using home-run wiring. This is especially important since drivers are often the first component to need attention, whether you’re checking voltage with a multimeter or replacing them.
Drivers also generate heat, so be sure to install them in ventilated areas, such as a vanity cabinet, rather than in sealed spaces. Following these steps ensures your LED system is not only visually appealing but also reliable and easy to maintain – something Thunder Bunny prioritizes in all its designs.
When to Call a Licensed Electrician
Working with LED wiring can be a safe DIY project when dealing with 12V or 24V systems. This is especially true when using a pre-configured shower niche lighting kit designed for easy installation. However, once you step into 120V AC territory, it’s time to involve a licensed electrician. While basic troubleshooting of low-voltage systems might be manageable on your own, tasks involving line-voltage wiring require professional expertise to ensure safety and compliance with electrical codes.
Line-Voltage Work Requires a Pro
If you’re considering tasks like adding circuits, replacing 120V switches or dimmers, hardwiring drivers, or installing GFCI outlets, these should always be handled by a licensed electrician. This approach guarantees not only safety but also adherence to local regulations.
"If you’re unfamiliar with electrical wiring, it’s best to hire a licensed electrician to handle the installation." – Switch LED
Here’s a breakdown of tasks and the level of expertise required:
| Task | DIY Friendly | Requires Licensed Electrician |
|---|---|---|
| 12V/24V DC plug-and-play kits | Yes | No |
| Troubleshooting low-voltage connectors | Yes | No |
| Replacing 120V wall switches/dimmers | No | Yes |
| Hardwiring drivers to main power | No | Yes |
| Adding new 120V circuits | No | Yes |
| Commercial or code-regulated spaces | No | Yes |
Even beyond installation, there are certain red flags that signal the need for professional help.
Warning Signs That Need Professional Attention
Some electrical issues are beyond what a DIY fix can handle. If you encounter any of the following problems, it’s crucial to stop using the system and call in an expert:
- Frequent breaker trips when the lights are turned on. This could indicate an overloaded circuit or excessive inrush current from the drivers.
- Persistent flickering, strobing, or buzzing from the driver or LED strips, even after verifying the power supply and connectors.
- Overheating drivers, visible burns, or melted wire insulation. These are serious fire hazards that demand immediate attention.
- Sparks or a burning smell when powering on the system.
"Professional input ensures safety, compliance, and performance, especially for larger or mission-critical installations." – HitLights
One smart practice is to test every circuit, dimmer, and switch before closing up junction boxes or mounting fixtures. Catching a wiring issue early can save you both time and money in the long run.
Conclusion: Safe and Well-Wired LED Installs
LED wiring problems often arise from mismatched voltages, undersized wires, loose connections, or incorrect IP ratings. Paying attention to these details can make the difference between a reliable setup and one plagued by flickering, dimming, or outright failure. Here’s what to keep in mind: size your power supply with at least 20% extra capacity, use thicker wires or a 24V system for runs over 16 feet to reduce voltage drop, and stick to a minimum IP65 rating – upgrading to IP67 or IP68 for areas exposed to water or heavy moisture. These steps help ensure both safety and durability.
As highlighted earlier, choosing the right voltage, proper wiring, and accessible driver placement are crucial for achieving optimal results. To simplify your project, you might explore options that address these common challenges. For example, Thunder Bunny’s LED lighting kits are tailored for spaces like shower niches, floating vanities, and toe kicks. They come pre-matched with waterproof components and include a 2-year warranty, so issues like voltage compatibility, connector quality, and moisture protection are already taken care of before you start.
"A well-installed LED strip system not only enhances your space but also provides reliable, efficient lighting for years to come." – HitLights
FAQs
How do I choose 12V vs 24V for my bathroom LEDs?
When deciding between 12V LED strips and 24V LED strips, consider the scope of your project. For smaller applications, like under-cabinet lighting or compact spaces, 12V strips are a budget-friendly and effective choice.
However, for longer runs exceeding 5 meters or where maintaining consistent brightness is essential, 24V strips are the better option. They minimize voltage drop, providing even illumination throughout the strip. Plus, they simplify installation by allowing the use of thinner cables and smaller connectors.
Choose the voltage that aligns with your specific setup to get the best results.
What IP rating do I need for each bathroom zone?
When choosing lighting or electrical fixtures for a bathroom, it’s important to consider the required IP (Ingress Protection) rating based on the specific zone:
- Zone 0 (inside the bath or shower): Requires an IP67 rating or higher to ensure it can handle full water immersion safely.
- Zone 1 (above the bath or shower, up to 2.25 meters): Needs an IP44 rating or higher to protect against splashing water.
- Zone 2 (up to 0.6 meters outside the bath or shower, up to 2.25 meters in height): Also requires an IP44 rating or higher for splash resistance.
- Outside these zones: No specific IP rating is mandatory. Standard indoor or outdoor-rated fixtures are typically sufficient.
Understanding these ratings helps ensure safety and durability in a moisture-prone environment like a bathroom.
How can I tell if my LED driver is overloaded?
If you’re trying to figure out whether your LED driver is handling more than it should, there are a few clear warning signs to watch for. Excess heat, buzzing sounds, or flickering lights could all point to an overloaded driver.
To avoid issues, double-check that the driver’s output voltage and current match your LED’s specifications. If the driver’s voltage or current goes beyond what the LED is designed to handle, you might notice frequent overheating or even premature failures. One way to confirm compatibility is by measuring the driver’s output voltage and ensuring it aligns with your LEDs’ requirements.
Related Blog Posts