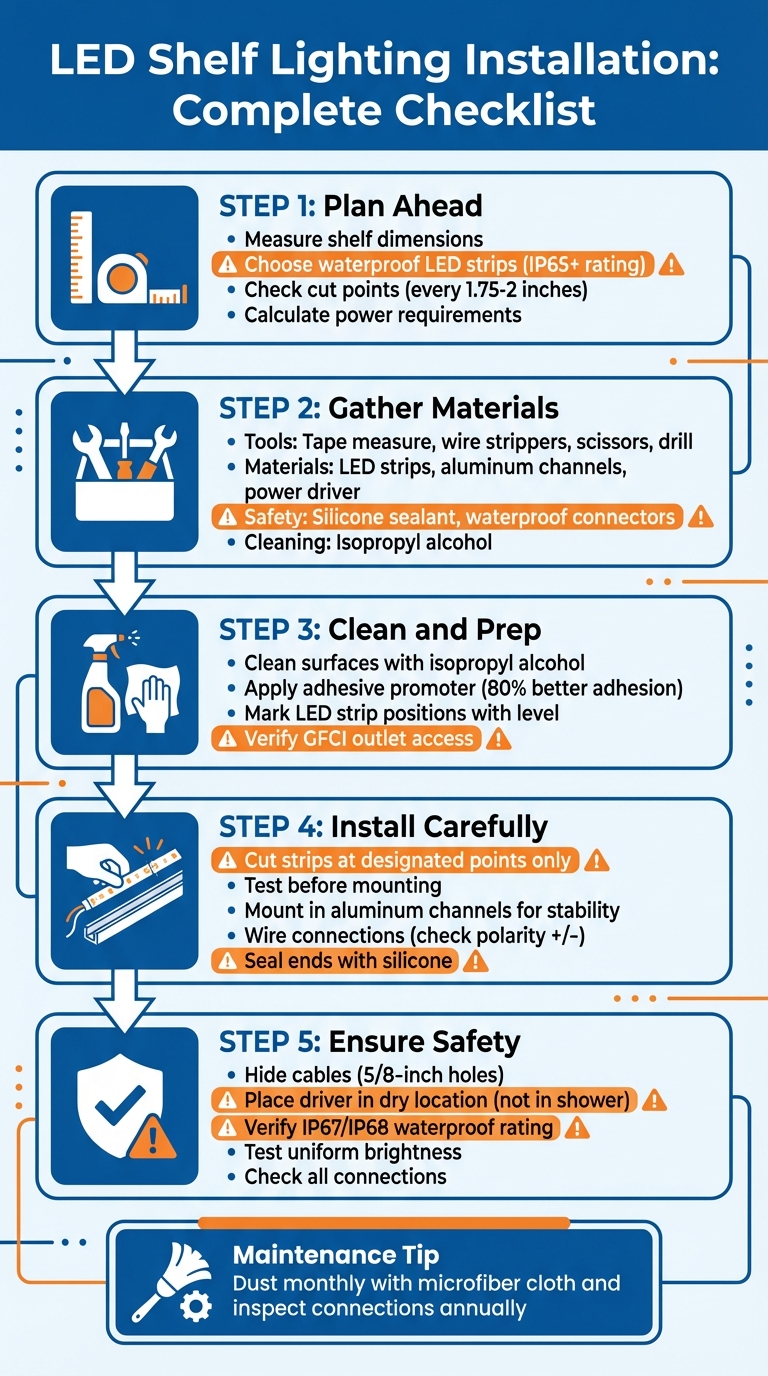
LED shelf lighting can transform your bathroom shelves into functional and stylish features. This guide walks you through everything you need to know, from planning and selecting the right materials to installation and maintenance. Here’s what you need to do:
- Plan Ahead: Measure your shelves, choose the best waterproof LED strips (IP65+), and ensure proper power requirements.
- Gather Materials: Get tools like a tape measure, wire strippers, and silicone sealant. Use aluminum channels for stability and heat management.
- Clean and Prep: Clean surfaces with isopropyl alcohol and mark exact LED strip positions for a polished finish.
- Install Carefully: Cut strips at designated points, mount them securely, and test connections before finalizing.
- Ensure Safety: Use waterproof connectors, hide cables, and place the LED driver in a dry, accessible location.
Following these steps ensures your LED shelf lighting is safe, efficient, and long-lasting. Regular maintenance, like dusting and inspecting connections, keeps your setup in top shape for years.
LED Shelf Lighting Installation Process: 5 Essential Steps
Planning Before Installation
Measure Shelf Dimensions and Layout
Start by measuring the total linear length of each shelf. Use a tape measure to get precise dimensions and determine the exact placement of the LED strip, not just along the front edge. For bathroom cabinets or mirrors, placing the strip 2–3 inches back from the front edge provides ideal task lighting for activities like applying makeup.
If you’re working with a shower niche or recessed shelf, consider the thickness of the tile and mortar. You’ll typically need a 3/8-inch to 5/8-inch gap to ensure the aluminum channel aligns perfectly with the tile surface. Also, measure the distance between the LED strip’s location and the power driver placement. This will help you choose the correct wire gauge to avoid voltage drop.
"Always check the cut length of a strip before purchase to ensure increments are size compatible with your design."
– Mark Riley, Ultimate Guide to Installing LED Strip Lights for Shelving
LED strips can only be cut at specific intervals, typically every 1.75, 2, or 4 inches, depending on the model. Be sure to check these cut points before purchasing to ensure the strip can be adjusted to fit your shelf dimensions perfectly.
Once you have accurate measurements, select LED strips and smart lighting tips that meet your specific design and installation needs.
Select Appropriate LED Strips
For bathroom shelves, water resistance is a must. Choose LED strips rated at least IP65 for general shelving and IP67 or IP68 for shower niches.
Pick a color temperature that complements your bathroom’s overall lighting. Warm white (3000K) works well with wood finishes to create a cozy vibe, while cool white (6000K) provides the bright, crisp lighting often preferred in bathrooms. When it comes to voltage, use 12V for runs under 16 feet and 24V for longer installations to maintain consistent brightness.
For reliable, water-resistant LED lighting designed for bathrooms, check out Thunder Bunny‘s offerings (https://thunderbunnyco.com).
Next, calculate the power requirements for your chosen LED strips.
Determine Power Needs
To calculate power needs, multiply the length of the LED strip by its watts-per-foot rating. Add a 20% margin to ensure the driver isn’t overloaded. For example, if your LED strips require 24 watts in total, select a power supply rated for at least 29 watts.
"It’s important that you have a safety margin for your lights at least 20% higher than the total wattage of the light."
– Screwfix Guide
Ensure the driver’s voltage matches your LED strips (12V or 24V), and place the power supply in an accessible, ventilated spot – such as under the vanity – for easy maintenance. Avoid hiding it behind a wall.
Collect Tools and Materials
Before starting, gather all the tools you’ll need: a tape measure, level, sharp scissors for cutting the strips, wire strippers (16–22 AWG), and a cordless drill with the appropriate screwdrivers. You’ll also need isopropyl alcohol to clean surfaces, strong double-sided tape or mounting clips, and cable ties for organizing wires.
For materials, make sure you have LED strips, aluminum channels with frosted diffusers, the power supply, and low-voltage wire (18–24 AWG, depending on the run length). If you’re installing in wet areas, don’t forget silicone sealant, end caps, and heat shrink tubing to waterproof all connections.
sbb-itb-6294289
Preparing the Shelves
Clean the Shelf Surface
Start by cleaning the installation area thoroughly with isopropyl alcohol to get rid of dust, grease, and debris. Once cleaned, let the surface dry completely.
For an extra-strong bond, consider using an adhesive promoter after cleaning. This can improve adhesion by up to 80%, especially in humid spaces like bathrooms. After applying the promoter, wait one minute before attaching the strips.
"Backing adhesive promoters are often overlooked, but dust accumulation or humidity on shelves can easily cause light strips to fall off. An adhesive promoter can enhance adhesion by 80%."
– LEDSuntech
If you’re working in a shower niche, make sure the surface has been treated with a waterproofing membrane, like RedGard, and is completely dry. For glass shelves, clean the edges carefully and think about using aluminum channels for a clean, adhesive-free look. To avoid transferring fingerprints or oils – especially on white or light-colored surfaces – wear cotton anti-slip gloves during installation.
Mark LED Strip Positions
Once the surface is prepped, take time to mark the exact layout for your LED strips. Use a pencil, tape measure, and level to ensure the placement is even and horizontal.
For shelving units with vertical dividers, mark spots where you’ll need to drill 5/8-inch diameter holes to feed the strips through seamlessly. If you’re installing on floating shelves, mark the wall position to keep both wiring and drilling discreet. In recessed niches, leave a 5/8-inch gap from the back wall to account for the thickness of tiles and mortar.
Creating a scaled sketch on graph paper can also be helpful. This allows you to visualize the layout and plan exit points for low-voltage wires, ensuring they stay hidden.
Check Power Outlet Access
Before mounting the LED strips, make sure a GFCI outlet is nearby, as this type of outlet is essential for safety in bathroom installations. Decide on a location for the LED driver – under a vanity or inside a cabinet works well to keep wiring out of sight and maintain proper airflow.
"Place the power outlets close to the middle shelves to reduce wiring complexity."
– LEDSuntech
Once you’ve confirmed power access, you’re ready to move on to mounting.
How to install LED Strip Lights in Shelving & Bars
Installing the LED Strips
For Thunder Bunny’s LED lighting kits, following these steps ensures your bathroom shelves are illuminated securely and for the long haul.
Cut LED Strips to Length
LED strips have specific cut points, usually marked by icons or solder pads, spaced every 1.75 to 2 inches. Cutting outside these points will break the circuit and render that section useless. Use precision cutters or heavy-duty scissors for a clean, straight edge – jagged cuts can damage the internal circuitry.
Before cutting, measure your shelf dimensions carefully with a tape measure. It’s better to cut slightly longer and adjust to the nearest cut point than to risk cutting too short. Always disconnect the power before cutting to avoid short circuits.
"Cutting elsewhere can damage the strip and render it unusable."
– VST Lighting
For bathroom installations, especially with IP65 or IP68 rated strips, reseal the cut end with 100% silicone sealant and attach an end cap. This step preserves water resistance and prevents moisture from corroding the copper pads over time. Once cut, test the strip to ensure it works before moving on.
Test Before Mounting
Before peeling off the adhesive backing, connect the LED strips to your power source to verify they’re functioning correctly. Check for consistent brightness and any flickering that might signal a loose connection. If you’re using multiple segments across different shelves, test each one individually with a voltage tester. This helps avoid the hassle of reinstalling later. Also, confirm that dimmers, remote controls, or smart app features are working as expected before securing the strips.
"A voltage tester can prevent reinstallations due to single-point failures after installation, saving time and effort!"
– LEDSuntech
Mount LED Strips
To ensure proper adhesion, peel off 6 to 18 inches of the backing at a time, reducing the risk of dust contamination. Press the strip firmly along its entire length to ensure full contact with the surface.
For bathroom installations, mounting the strips inside aluminum channels (like the Schluter SG110 or SG Deco) provides better stability than adhesive alone. These channels also act as heat sinks, which is especially important for high-power strips exceeding 14 watts per meter. Secure the channels to the shelf with thin-set mortar or screws, and waterproof any screw holes to prevent damage.
After mounting, seal both ends of the strip and the cable entry point with 100% silicone to block out moisture and help the adhesive stay intact over time.
Wire the Connections
Proper wiring is critical to avoid future performance issues. When connecting multiple strip segments, make sure the positive (+) and negative (−) markings align – reversed polarity can damage the strip. Use waterproof connectors or solder the joints, then cover them with heat-shrink tubing for added protection. This is especially important in bathroom installations.
Take your time with this step, as poor electrical connections are responsible for 70% of LED performance problems. If soldering, ensure the joint is smooth and secure before applying the heat-shrink tubing. For connector-based systems, press the pins firmly until they click into place. Leave some slack in the wiring to make future replacements easier without damaging the shelf or tiles.
Connecting Power and Wiring
Once your LED strips are mounted, the next step is to connect them to a nearby power source. This step is especially important in bathrooms, where moisture can pose additional risks.
Hide Cables
To achieve a clean, polished look, hide the low-voltage wires by running them through the wall before sealing it with cement board or tile. You can drill 5/8-inch holes at cabinet corners or behind dividers to keep the wires out of sight. For floating shelves, consider installing a conduit inside the wall to guide the wires directly to the driver.
If you’re working with existing shelves, you can use paintable raceways or adhesive cable clips to secure the wires along seams and joints. Flat extension cords or low-voltage wires are ideal for routing behind panels or under slim shelves. For the best adhesion, clean the surfaces with alcohol before applying the clips.
"Visible wires instantly ruin the illusion of hidden lighting."
– Flyachilles
Connect the LED Driver
After concealing the cables, the next step is connecting the LED driver (power supply). Never install the driver inside the shower enclosure. Instead, place it in a safe, dry location like a linen closet, vanity cabinet, or ceiling cavity. To ensure reliable performance, choose a driver rated for at least 20% more wattage than your total LED load. This prevents overheating and extends the lifespan of your setup.
For longer runs – over 30 feet – use 16 AWG or 14 AWG wire to reduce voltage drop and prevent dimming. Always double-check the polarity, ensuring red wires connect to (+) and black wires to (–). If you’re using Thunder Bunny’s LED lighting kits, heat-shrink butt connectors are required to meet NEC standards for wet area connections.
Once the driver is installed and all wires are connected, verify that everything complies with electrical safety standards.
Verify Electrical Safety
Before turning on the power, inspect all connections to ensure they are secure and correctly wired. Double-check polarity and confirm that no connections are loose. If your low-voltage wires need to run alongside or cross 110V/120V AC lines, use shielded wire to reduce electrical interference.
Additionally, make sure your installation adheres to NEC Article 411, which governs low-voltage lighting systems. If you’re not confident working with 120-volt wiring, it’s wise to hire a licensed electrician. Electrical work in bathrooms demands precision and a focus on safety.
Testing and Final Setup
Once your LED strips are installed and wired, it’s time to test everything and finalize the setup. Start by powering on the lights to check for uniform brightness. Look closely for any dark spots, flickering, or inconsistencies. If you’re using dimmable or color-adjustable strips, test the dimming and color settings to ensure the controller and driver are working together as they should. If you notice flickering, double-check your connections and confirm that your dimmer is compatible with the system, especially when following a guide to shower niche lighting kits.
"The lighting industry has waded through the often-choppy, often-murky waters of LED dimming over the last several years and, while a lot of the problems have been solved, flickering and strobing and early burnout still happens all the time."
– Lighting Specialist Insight
Test the Lights
Turn on the lights and carefully inspect the brightness, intensity, and color across all sections. Pay attention to any areas that look dim or aren’t responding. If you find issues, check the electrical connections to make sure everything is secure and properly aligned.
Once you’ve confirmed that the lights are functioning as expected, move on to securing the components for your bathroom niche lighting.
Secure Loose Components
Use mounting clips or cable ties to secure any loose parts. For LED strips with adhesive backing, press firmly along the entire strip, especially at the ends where detachment is more likely. If you’re using aluminum channels, wait to snap the plastic diffusers into place until you’ve confirmed that the LED strips are positioned correctly and the lighting effect is smooth. Tidy up any loose cables by fastening them behind panels or shelves with invisible clips or Velcro for a polished look.
Check Water Resistance
After securing the components, it’s crucial to verify water resistance, especially if the setup is in a damp environment. Ensure that all parts are rated IP67 or IP68 for moisture protection. Pay special attention to connection joints, as these are common failure points when waterproof seals are compromised during cutting. Use neutral cure silicone or waterproof sealant to protect cable entries and channel ends. Glue-lined heat shrink tubing is another effective option for creating a strong, sealed bond. Finally, place the LED driver in a safe, dry location – such as a linen closet or vanity cabinet – to reduce exposure to water and make future maintenance easier.
"The profile cover is NOT a water barrier. Moisture will get inside. The LED strip inside must be independently waterproof (IP67)."
– VST Lighting
Conclusion and Maintenance Tips
Keeping your LED shelf lighting safe, efficient, and visually appealing starts with proper installation and regular maintenance. A well-thought-out plan, waterproof components rated IP67 or higher, and placing the LED driver in a dry, accessible spot lay the groundwork for reliable, long-term performance. Taking the time to install everything correctly now can save you from headaches later.
To maintain your lighting, give the strips a gentle dusting every month using a soft microfiber cloth. This simple step helps prevent overheating and brightness loss over time. Avoid spraying harsh chemicals directly on the strips, as these can weaken the adhesive backing. For tougher messes, lightly dab the area with a warm, damp cloth – just don’t scrub, as this could damage the delicate solder joints.
Make it a habit to inspect connections annually, especially at junction points where moisture might sneak in. If you notice flickering or dimming to about 70% of the original brightness, it’s a sign the LEDs have reached the end of their lifespan and need replacing. To get more life out of your lights, consider running them at 70% to 80% brightness using a compatible dimmer – this small adjustment can make a big difference.
Choosing quality components also plays a huge role in reducing maintenance headaches. For setups like shower niches or vanity shelves, Thunder Bunny offers LED lighting kits priced between $249.00 and $350.00. These IP67-rated, waterproof kits include a 2-year warranty and replaceable strips, making upkeep straightforward. With an average rating of 5.0 out of 5 from 18–19 customer reviews, these kits are a solid choice for durability and ease of use.
"To ensure that the LED adhesive remains secure for the life of the product, surfaces should be free of dust and debris prior to install."
– Inspired LED
FAQs
How do I choose between IP65, IP67, and IP68 LED strips?
When deciding, it’s all about how much water exposure the area will face. IP65 works well for spots with light splashes, like bathroom walls. IP67 can handle short-term submersion, making it a great choice for shower niches or outdoor spaces. For areas that need to withstand constant submersion, IP68 is the way to go – perfect for wet zones or underwater installations. For bathroom shower niches, IP67 or IP68 is the safest and most durable option.
What wire gauge should I use to prevent voltage drop on long runs?
To reduce voltage drop in long runs of LED strip lighting, opt for a thicker wire gauge, such as 18 AWG. This gauge works well for both 12V and 24V LED strips, offering enough current capacity to maintain consistent brightness over extended distances. Using a heavier gauge wire ensures stable voltage throughout the entire strip, which is especially important for longer installations.
Why should I use aluminum channels instead of sticking strips directly on the shelf?
Aluminum channels offer a sleek, polished finish by securely housing LED strips and distributing light evenly for a more refined appearance. Beyond aesthetics, they enhance durability by helping dissipate heat, which extends the life of the LEDs. These channels also shield the strips from dust and physical damage. Compared to simply sticking LED strips onto a surface, aluminum channels provide a longer-lasting, low-maintenance solution that looks far more professional.
Related Blog Posts