LED lighting in bathrooms combines energy efficiency, durability, and style, but proper planning is crucial for safety and functionality. Here’s a quick guide to the 7 best tips for bathroom LED lighting:
- Waterproof Fixtures: Use IP-rated LEDs (e.g., IP67 for showers, IP44 for sinks) to handle moisture and ensure safety.
- Task Lighting: Place sconces or horizontal lights near mirrors to avoid shadows – ideal for grooming.
- Accent Strips: Add LED strips under vanities or in shower niches for a modern look and soft glow.
- Recessed Lights: Install wet-rated fixtures above showers and tubs for balanced illumination.
- Dimming Options: Choose dimmable LEDs with adjustable color temperature (e.g., warm white for relaxation, cool white for tasks).
- Safety Standards: Follow NEC guidelines, use low-voltage systems in wet zones, and install GFCI outlets.
- Durable Installation: Use aluminum channels, silicone sealing, and waterproofing for long-lasting performance.
LEDs are energy-efficient (75–80% less energy than incandescent bulbs) and can last 25,000–50,000 hours. Thoughtful placement and adherence to safety codes transform your bathroom into a functional, stylish, and safe space for daily routines or relaxation.
Bathroom Lighting Zones and IP Rating Requirements Guide
1. Use Waterproof LED Lights in Wet Areas
Waterproofing and Durability for Wet Areas
Bathrooms are tough environments for standard LED fixtures. The constant exposure to humidity, steam, and temperature changes can lead to corrosion and electrical malfunctions in non-waterproof lighting. That’s why waterproof LED fixtures are a must – they not only ensure safety but also provide reliable, long-lasting performance.
To choose the right fixture, you’ll need to understand IP (Ingress Protection) ratings, which measure a light’s resistance to water. For example, IP65-rated fixtures can handle water jets, making them ideal for shower ceilings (Zone 1). On the other hand, IP44-rated fixtures are splash-resistant and work well near sinks or areas within about 2 feet of water sources (Zone 2). With integrated LED fixtures offering lifespans of 50,000 to 100,000 hours, selecting the right IP rating is crucial – but it’s only the first step.
Proper wiring and installation are just as important to ensure your waterproof LEDs perform as expected.
Compliance with Safety and Wiring Standards
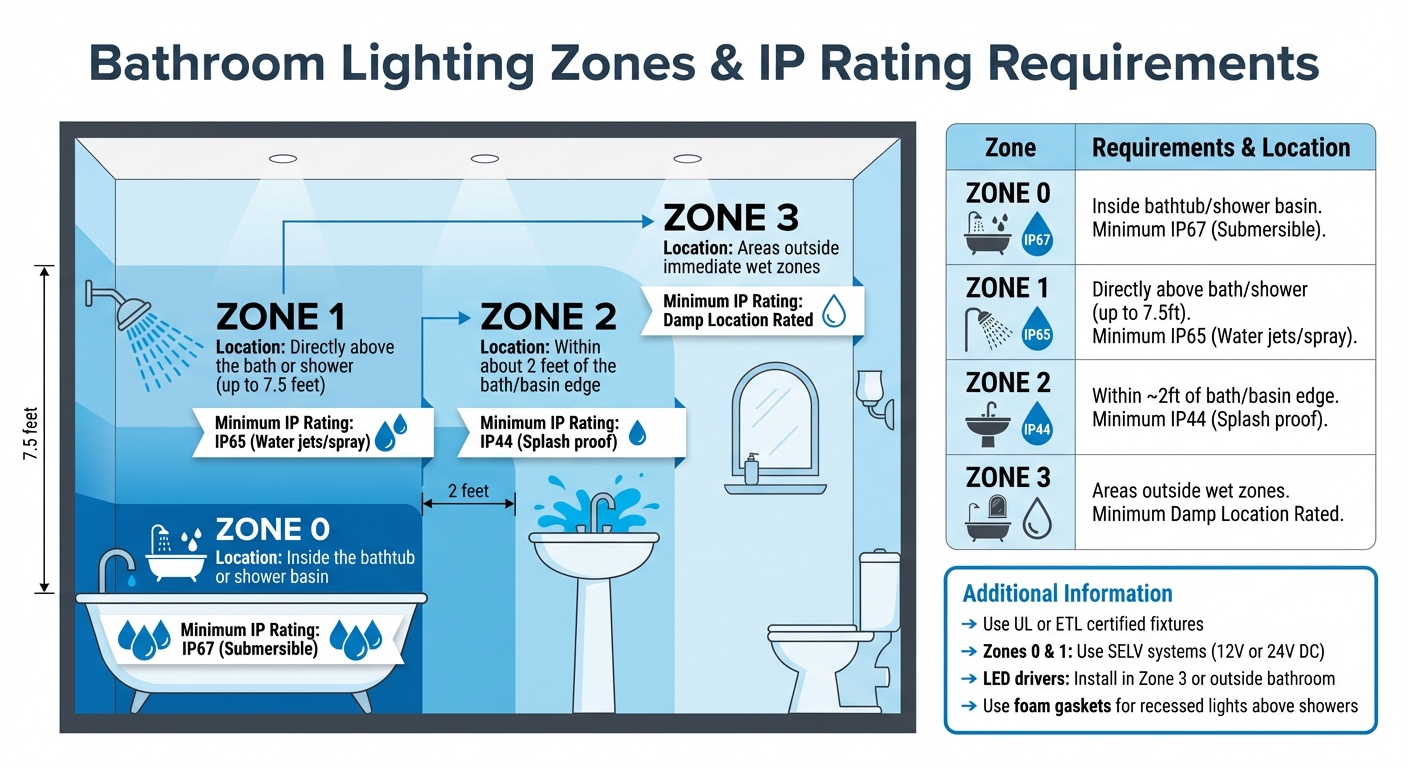
Installing waterproof LEDs in bathrooms means adhering to strict electrical codes tailored for wet zones. Bathrooms are divided into zones based on their exposure to water, and each zone has specific requirements:
| Bathroom Zone | Location Description | Minimum IP Rating |
|---|---|---|
| Zone 0 | Inside the bathtub or shower basin | IP67 (Submersible) |
| Zone 1 | Directly above the bath or shower (up to 7.5 feet) | IP65 (Water jets/spray) |
| Zone 2 | Within about 2 feet of the bath/basin edge | IP44 (Splash proof) |
| Zone 3 | Areas outside immediate wet zones | Damp Location Rated |
Look for UL (Underwriters Laboratories) or ETL (Intertek) certifications to ensure fixtures meet North American safety standards. For Zones 0 and 1, opt for Safety Extra Low Voltage (SELV) systems, typically running on 12V or 24V DC, instead of high-voltage options like 110V. Also, remember that LED drivers (power supplies) should never be placed inside shower enclosures. Instead, install them in Zone 3 or outside the bathroom entirely, such as in a ceiling cavity or linen closet.
For recessed lights above showers, use foam gaskets to seal the fixture tightly against the ceiling. This added step helps block moisture from reaching the light’s housing, ensuring durability and safety.
sbb-itb-6294289
2. Plan Task Lighting Around Vanity and Mirror
Placement and Layout for Optimal Illumination
Relying only on an overhead fixture can create harsh shadows, making grooming tasks more difficult.
“While recessed lighting can be a great choice for ambient bath lighting, using cans around the vanity is a bad idea. Direct lighting above your head will cast extreme shadows.” – Lumens Admin
To eliminate shadows, consider mounting vertical sconces on either side of the mirror at eye level, typically 60–70 inches from the floor and spaced 28–30 inches apart. If side sconces aren’t an option, install a horizontal fixture above the mirror, positioned 75–80 inches high, and ensure it spans at least 75% of the mirror’s width.
For a sleek, modern look, integrated LED mirrors provide consistent, front-facing illumination. These mirrors not only enhance the aesthetic but also boast impressive lifespans of 30,000 to 50,000 hours. Brands like Thunder Bunny offer LED solutions that combine style with functionality.
Energy Efficiency and Dimmable Options
The American Lighting Association suggests vanity lights should deliver at least 1,600 lumens. However, energy-efficient LED fixtures can achieve comparable brightness with just 1,200 lumens. For tasks like makeup application, opt for LEDs with a high Color Rendering Index (CRI) of 90 or above and a color temperature between 3,000K and 4,000K for natural, accurate lighting.
Adding dimmable LED fixtures on a dedicated switch allows you to shift between bright lighting for detailed tasks in the morning and a softer, relaxing ambiance in the evening. LEDs also offer significant energy savings – up to 80% compared to traditional bulbs – and can last up to 50,000 hours. While prioritizing energy efficiency, don’t overlook electrical safety.
Compliance with Safety and Wiring Standards
To meet safety standards, ensure your bathroom is equipped with Ground Fault Circuit Interrupter (GFCI) outlets. These outlets are essential for preventing electrical shocks in areas close to water. Since the vanity area falls under Zone 2, lighting fixtures should have at least a damp rating (IP44 minimum) to handle moisture exposure. If the vanity is within 6 feet of a bathtub or shower, wet-rated fixtures are a safer choice.
For proper installation and to ensure compliance with the National Electrical Code, hire a licensed electrician.
3. Add LED Strips Under Floating Vanities and Toe Kicks
Placement and Layout for Optimal Illumination
Adding LED strips under floating vanities and along toe kicks can elevate both the look and practicality of your bathroom. These slim, flexible lights are ideal for creating a soft, even glow. For the best results, position the strips about 2–4 inches above the floor. This spacing ensures consistent brightness and avoids any harsh shadows. Opt for high-density LED strips to achieve a smooth, gap-free illumination that feels seamless.
Under floating vanities, these lights create a striking “floating effect”, giving the space a spa-like vibe while doubling as a discreet nightlight. To keep the setup clean and durable, install the strips in aluminum channels with lenses. This not only shields the LEDs from dust and debris but also gives the installation a polished, professional finish. If you want to direct the light more precisely, consider using 30- or 60-degree corner channels for better floor coverage.
Before you dive into installation, you’ll also need to address moisture protection to ensure the setup lasts.
Waterproofing and Durability for Wet Areas
Bathrooms are no strangers to water spills and regular cleaning, so waterproofing is a must. Choose LED strips with at least an IP65 rating to guard against moisture. For areas exposed to direct water or heavy cleaning, go for IP67 or IP68-rated strips. Thunder Bunny offers waterproof LED kits specifically designed for floating vanities and toe kicks, with prices ranging from $39.00 to $150.00, depending on the length and driver options.
“The profile cover is NOT a water barrier. Moisture will get inside. The LED strip inside must be independently waterproof (IP67).” – VST Lighting
To further protect your setup, mount the strips in anodized aluminum profiles and encase them in waterproof silicone. This combination helps manage heat and shields the lights from water damage.
Compliance with Safety and Wiring Standards
Once you’ve planned the placement and waterproofing, it’s crucial to follow safety guidelines for wiring. Use a low-voltage (12V or 24V) SELV driver, and make sure it’s installed in a dry, safe location like a linen closet or ceiling cavity. To minimize voltage drop, use thicker wires – 16AWG or 14AWG are good choices.
Before applying adhesives, clean the surface with rubbing alcohol to ensure a secure bond. For added durability, solder the wires directly to the LED strip’s PCB and seal the connections with neutral-cure silicone and heat-shrink tubing to prevent oxidation. If you’re planning a hardwired setup, always hire a licensed electrician to ensure everything meets local electrical codes.
4. Install LED Lighting Kits in Shower Niches
Placement and Layout for Optimal Illumination
Proper placement of LED strips in shower niches is crucial to avoid glare and ensure even lighting. For horizontal niches, install LED strips along both the top and bottom edges to create balanced illumination. When cutting side tiles, leave a slight overlap (3/8–5/8 inch) over the recessed LED channel. This technique helps hide the aluminum profile and produces a seamless glow.
“When cutting side tiles, ensure the bottom tile extends slightly below the LED strip. This will create a hidden lighting effect rather than exposing the aluminum channel.” – Thunder Bunny Co.
Adding a plastic diffuser over the LED strip minimizes harsh light spots and creates a smooth, soft glow. For niches with multiple shelves, install lighting between each level to ensure all shelves are well-lit. This approach aligns with earlier recommendations for vanity and toe kick lighting, maintaining consistent and safe illumination throughout the bathroom.
Waterproofing and Durability for Wet Areas
Shower niches demand extra attention to waterproofing. Use LED strips with an IP67 or IP68 rating for reliable performance in wet conditions. While IP65-rated strips offer water resistance, they may not handle heavy steam or temperature changes effectively.
Start by applying a waterproofing membrane, like RedGard, to the entire niche before installing the LED components. Seal the cut ends of the LED strips with end caps and waterproof silicone included in the kit. If screws are used to secure the aluminum channel, apply a waterproof sealant over the screw heads to prevent leaks. Thunder Bunny offers LED lighting kits for shower niches priced between $249.00 and $350.00. These kits feature IP68-rated COB LEDs and have received a 5.0/5 rating from customers, who highlight the high-quality materials and detailed installation guides.
Compliance with Safety and Wiring Standards
Adhering to low-voltage wiring standards is essential for safe and effective LED installations in shower niches. Only use Safety Extra Low Voltage (SELV) systems, such as 12V or 24V DC, as higher voltages (110V/220V) pose a serious shock hazard in wet environments. The National Electrical Code (NEC) mandates the use of heat-shrink butt connectors for all low-voltage wire connections to ensure a watertight seal.
“It is a NEC requirement that the heat shrink butt connectors be used to connect the LEDs.” – Thunder Bunny Co.
Position the LED driver outside the shower area, such as under a floating vanity or inside a cabinet, to protect it from moisture and allow easy access for maintenance. Use 16- or 14-gauge two-conductor low-voltage wire to connect the niche to the driver, and run the wiring before closing the walls with cement board. Before tiling, test the dimmer and light strip to verify proper polarity and eliminate any flickering issues.
5. Place Recessed Lights Above Shower and Tub
Placement and Layout for Optimal Illumination
When it comes to lighting showers and tubs, the right placement of recessed lights can make all the difference in both function and style. A simple rule of thumb for spacing is to divide the ceiling height by two. For instance, if your ceiling is 9 feet high, position the lights about 4.5 feet apart. In smaller showers, like a 3’x3′ area, one recessed light is usually enough. For specialized areas, you can also install a shower niche lighting kit to highlight shelving and improve visibility. However, larger, more luxurious showers might need two or more fixtures for even lighting and added safety.
For bathtubs, using two fixtures ensures balanced lighting across the space. Keep lights at least two feet away from the walls to avoid harsh shadows. If you’re working with sloped ceilings or want to highlight intricate tilework, consider gimbal recessed lights that can be adjusted up to 40° for better focus.
Waterproofing and Durability for Wet Areas
In wet areas like showers and tubs, choosing the right type of fixture is essential. Wet-rated fixtures are designed to handle direct water exposure, while damp-rated ones work well in areas with high moisture but no direct spray. The National Electrical Code (NEC) 2020 410.10 (D) provides clear guidance:
“Lights located within the shower to a height of eight vertical feet ‘shall be marked suitable for damp locations or marked suitable for wet locations.'” – National Electrical Code (NEC) 2020 410.10 (D)
To further protect against moisture, use foam gaskets to seal the fixtures and prevent water from entering the wiring or ceiling cavity. Integrated LED fixtures are a smart choice for wet areas because they’re sealed tightly and don’t require bulb replacements. These fixtures are built to last, often offering up to 50,000 hours of use – equivalent to around 5.5 years of continuous operation.
Energy Efficiency and Dimmable Options
Energy-efficient LED bulbs are a perfect match for recessed lighting in bathrooms. For showers, LED bulbs in the 7–9 watt range provide the same brightness as a 60-watt incandescent bulb. To achieve the right level of lighting, aim for 50–75 lumens per square foot.
For added flexibility, pair your LEDs with a dimmer switch to adjust brightness based on your needs. The color temperature of the bulbs also plays a key role in setting the mood. Use 3,500K to 6,500K for bright, energizing light in the morning, or opt for a warmer range of 2,000K to 3,000K for a relaxing, spa-like feel. If color accuracy is important, such as for makeup application, choose bulbs with a Color Rendering Index (CRI) of 85–90.
Compliance with Safety and Wiring Standards
To ensure your recessed lights are installed safely and meet local codes, always hire a certified electrician. If you’re switching to ultra-thin LED fixtures, remove the old housings to allow the metal springs to create a secure, moisture-resistant seal.
| Feature | Damp-Rated Fixtures | Wet-Rated Fixtures |
|---|---|---|
| Water Exposure | Handles moisture/steam; no direct spray | Built to withstand direct water contact/splashing |
| Typical Location | Above vanities or bathroom perimeter | Inside showers or above tubs |
| Sealing | Partially sealed | Fully sealed wiring components |
| NEC Requirement | Ideal for high humidity | Required for spray zones up to 8 feet high |
These tips tie into the broader LED bathroom lighting strategy, ensuring your space is not only functional but also visually appealing.
6. Choose Dimmable LEDs with the Right Color Temperature
Energy Efficiency and Dimmable Options
Dimmable LEDs allow you to tailor your bathroom lighting to match your daily needs. When selecting LEDs, consider the color temperature: cool white (4,000K–5,000K) is ideal for tasks like grooming, shaving, or applying makeup, as it mimics natural daylight. On the other hand, warm white (2,700K–3,000K) creates a relaxing, spa-like ambiance – perfect for winding down after a long day. Cool lighting enhances focus and energy during morning routines, while warmer tones help set a calming mood.
For added versatility, opt for fixtures that offer adjustable settings. These can provide bright, invigorating light in the morning and a soft, soothing glow in the evening. Look for bulbs with a CRI (Color Rendering Index) of 90 or higher to ensure accurate skin tones and makeup application. Fixtures with field-selectable CCT (Correlated Color Temperature) allow you to switch between warm, neutral, and cool tones during installation, making it easier to match your bathroom’s design and lighting needs. This flexibility not only boosts energy efficiency but also enhances visual comfort.
Compliance with Safety and Wiring Standards
To ensure a smooth and safe setup, make sure your dimmable LEDs and dimmer switches are compatible. Regular incandescent dimmers can cause flickering or buzzing with LEDs, so it’s essential to use LED-specific dimmers. Reliable options include the Lutron Maestro PRO or Leviton DSM10, which are designed for standard in-wall wiring. For those looking to maximize your bathroom’s potential with smart lighting tips, the Lutron Caseta Dimmer paired with a Smart Bridge offers the convenience of app-based or voice control.
Also, confirm that the LED driver load aligns with the dimmer’s minimum requirements to prevent issues like strobing or flickering. Most residential setups use Triac (phase-cut) dimmable drivers, while commercial spaces may rely on 0-10V or DALI systems for seamless, flicker-free dimming. Always mount LED drivers in dry, easily accessible areas outside of wet zones to ensure safety and longevity.
For more ideas and bathroom-specific LED solutions, check out Thunder Bunny’s lighting kits at Thunder Bunny.
7. Follow Electrical Safety Codes and Protocols
Compliance with Safety and Wiring Standards
When it comes to bathroom lighting, safety isn’t just a good idea – it’s mandatory. Ensuring your setup aligns with NEC standards is crucial. These standards define bathroom zones to guide fixture selection and placement for maximum safety. For example:
- Zone 0: Use IP67 or IP68 fixtures, as this is the area inside bathtubs or showers where full immersion can occur.
- Zone 1: Install IP65 or higher-rated fixtures, suitable for areas directly above tubs or showers.
- Zone 2: Fixtures rated IP44 or better work here, as this zone extends 2.5 feet horizontally and 7.2 feet vertically around bathtubs or showers.
- Zone 3: Beyond these zones, standard residential fixtures may be used, provided they’re not exposed to water spray.
To further minimize risk, all bathroom lighting circuits should be safeguarded by a Ground Fault Circuit Interrupter (GFCI). This device is essential in high-moisture areas to prevent electrical shocks. Additionally, use low-voltage SELV systems (12V or 24V DC) in Zones 0 and 1. Between the two, 24V systems are often the better choice – they generate less heat, handle longer cable runs (up to 10 meters compared to 5 meters for 12V), and carry half the current for the same wattage.
LED drivers, which convert high voltage to low voltage, should always be installed in Zone 3 or outside the bathroom entirely. Ideal locations include a linen closet or ceiling cavity to keep high-voltage lines far from water exposure. If the driver is placed 10–15 feet away, opt for 16AWG or 14AWG wire. For added durability, seal soldered connections with neutral-cure silicone and glue-lined heat shrink tubing to protect against moisture.
Waterproofing and Durability for Wet Areas
In damp environments like bathrooms, waterproofing is just as important as proper wiring. When sealing LED strips, always use neutral-cure silicone to avoid copper corrosion, which can compromise the integrity of your fixtures. Avoid mounting high-IP-rated LED strips directly onto drywall. Instead, use anodized aluminum profiles as heat sinks. These profiles not only manage heat effectively but also prevent waterproof epoxy from yellowing – a common issue that can lead to premature LED failure.
For reliable and compliant LED solutions, check out Thunder Bunny.
How to Install LED Lights In Shower Niche — ACTUAL JOB!!
Conclusion
Transforming your bathroom with LED lighting comes down to smart planning and thoughtful execution. By incorporating waterproof fixtures in wet zones, task lighting around mirrors, accent strips beneath vanities, illuminated shower niches, strategically placed recessed lights, dimmable controls, and proper electrical safety measures, you can create a space that serves dual purposes. It can be a bright, energizing spot for your morning routine and a calming, spa-like retreat in the evening.
A well-designed LED setup not only enhances the room’s aesthetics but also ensures practical benefits. It highlights architectural features, provides shadow-free lighting for daily tasks, and improves safety by clearly illuminating floors and storage areas. Plus, LEDs use less energy and last far longer than traditional bulbs, making them an efficient choice.
“For larger bathrooms, illuminating a mirror with an LED light strip adds a wow element and extra glitz to the decor” – Sally Storey, John Cullen Lighting
For specific needs like shower niches or floating vanities, pre-configured LED kits can simplify the process. Companies like Thunder Bunny offer waterproof LED lighting kits, complete with expert installation guidance, making it easier to achieve a professional finish.
FAQs
What IP rating do I need for my shower and vanity lights?
When choosing shower and vanity lights, it’s best to go for an IP65 rating or higher. This rating ensures the lights are well-protected against water and moisture, making them suitable for damp areas like bathrooms, particularly near showers or sinks.
How many lumens should bathroom vanity lighting have?
Bathroom vanity lighting should provide 70-80 lumens per square foot to ensure sufficient brightness. The exact requirement can vary based on factors such as the size of your bathroom, the dimensions of your mirror, and the color scheme of the space. Aim for lighting that not only illuminates effectively for tasks like grooming but also enhances the overall ambiance of the room.
Should I use 12V or 24V LED strips in wet areas?
For areas prone to moisture, it’s best to opt for waterproof LED strips paired with low-voltage systems. A 12V DC system works well for smaller setups, providing safety and efficiency. For longer installations where consistent brightness is key, a 24V system is a better choice. Make sure the strips have a waterproof rating like IP65 or IP68 and are installed correctly to ensure both safety and long-lasting performance.
Related Blog Posts