LED lighting can transform any bathroom, but installation mistakes often lead to flickering lights, poor adhesion, or even safety risks in wet areas. This guide tackles the five most common LED kit installation issues and provides practical solutions to avoid costly errors. Here’s what you’ll learn:
- Voltage mismatches: How to pair LED strips and power supplies correctly.
- Moisture protection: Choosing the right IP rating for wet zones.
- Cutting and connections: Proper techniques to maintain circuit integrity.
- Adhesion and heat management: Tips for secure mounting and longer lifespan.
- Dimming and color consistency: Fixing flickering and ensuring even brightness.
Why Your LED Installation Isn’t Working & How To Fix It
sbb-itb-6294289
LED Kit Components and How They Work Together
Getting familiar with LED kit components is essential to avoid mismatches that can lead to performance issues later on.
Key LED Kit Components
An LED kit is essentially a complete system. At its core is the LED strip, a flexible PCB that houses LEDs, resistors, and copper traces. The resistors play a critical role by regulating the current to ensure the LEDs operate efficiently and last longer:
"
The power supply, often referred to as the driver, converts standard line voltage into low voltage – typically 12V or 24V DC – to power the strip. Between the driver and the strip, a controller or dimmer is used to manage brightness and color. In RGB systems, the controller uses four pins – three for colors and one common pin – for precise color mixing. For the system to work reliably, all components must be matched in terms of voltage and wattage.
Thunder Bunny kits address compatibility concerns by pre-matching these components. For example, RGB systems are wired with 20/3 gauge low-voltage wire, while white systems use 18/2 gauge wire. The power supply is factory-specified to fit the LED strip, ensuring seamless operation.
Another important consideration is respecting the designated trim points on the LED strip to maintain the circuit’s integrity. On 12V strips, each circuit segment typically contains three LEDs and one resistor. Cutting outside these segments can disrupt the circuit. However, Thunder Bunny’s strips are designed to be trimmed at any point using standard scissors, eliminating this issue.
These carefully designed components provide a solid foundation, but additional adjustments are needed for specific environments like bathrooms.
Planning for Bathroom Installations
When planning LED installations in bathrooms, there are extra factors to keep in mind, such as moisture protection and proper power calculations.
Start by calculating the total power draw of the LED strip and choosing a power supply rated 20–30% higher than the calculated load. Note that voltage drop can become an issue: on 12V systems, it typically occurs beyond 16 feet (5 meters), whereas 24V systems extend this range to about 33 feet (10 meters) before requiring a power injection.
Moisture protection is equally important. For strips installed in areas exposed to water, such as shower niches, you need an IP67 rated product. Additionally, make sure to position the driver and controller before tiling to allow for easy servicing later on.
5 Common Installation Issues and How to Fix Them
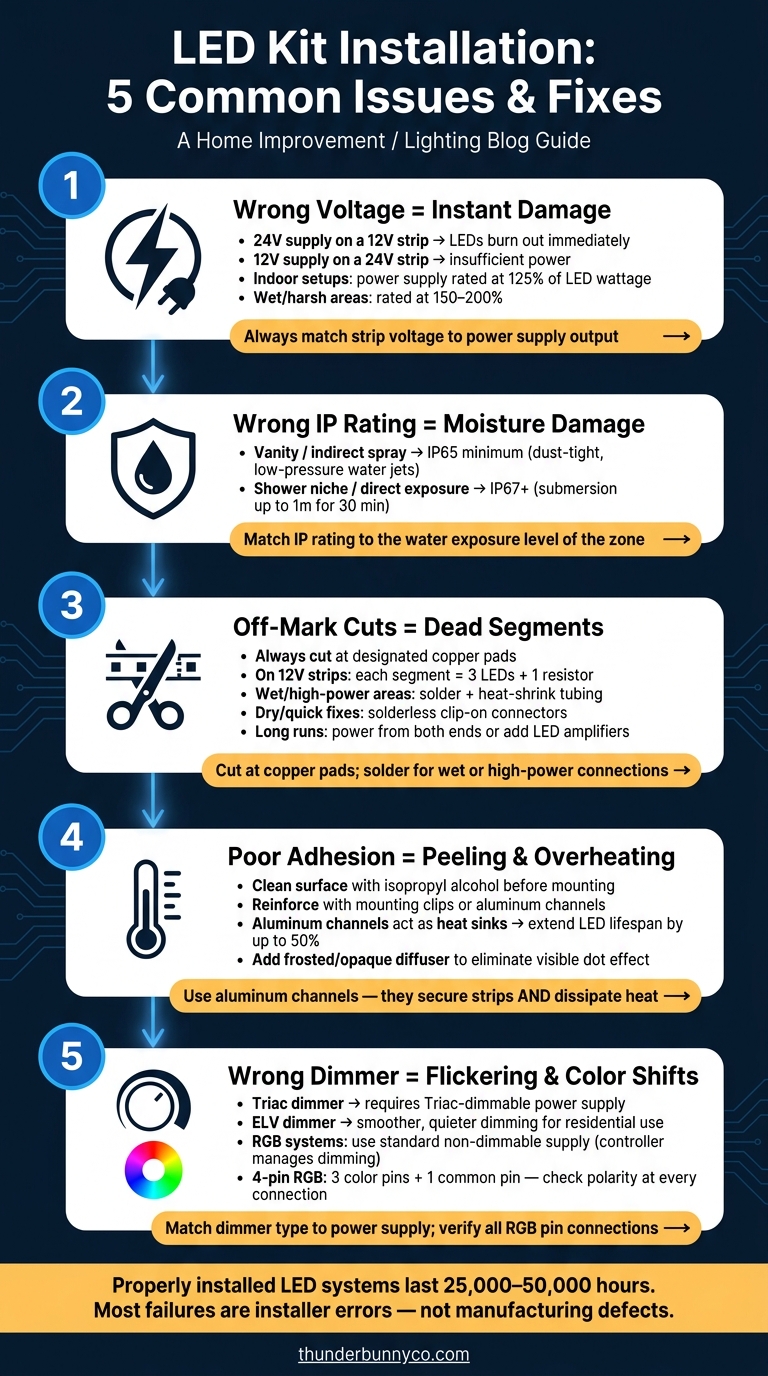
LED Kit Installation: 5 Common Issues & Fixes
When it comes to LED installations, even small mistakes can lead to big headaches. Below are five frequent installation issues and practical ways to address them.
Power and Voltage Mismatches
Voltage mismatches are a common culprit behind damaged LED setups. For instance, connecting a 24V power supply to a 12V LED strip will burn out the LEDs instantly. On the flip side, using a 12V supply with a 24V strip won’t provide enough power. Always double-check the voltage of your LED strip before choosing a power supply.
An undersized power supply can also cause flickering and overheating. For indoor bathroom setups, aim for a power supply rated at 125% of the total LED wattage. In areas exposed to moisture or harsh conditions, bump that up to 150–200% to ensure durability.
Your control method plays a role in selecting the right power supply. Here’s a quick reference table to guide you:
| Control Type | Required Power Supply Type | Common Application |
|---|---|---|
| Triac Dimmer | Triac Dimmable | Standard residential wall switches |
| ELV Dimmer | ELV Dimmable | Smooth, quiet dimming at home |
| RGB/RGBW Controller | Standard Non-Dimmable | Color-changing LED strips |
| 0-10V Dimmer | 0-10V Dimmable | Commercial dimming systems |
To avoid surprises, assemble and test the entire system – power supply, controller, and light panels – before securing anything permanently.
Moisture Protection and IP Ratings in Wet Areas
For bathroom installations, using fixtures with the correct IP rating is critical. Installing a product meant for damp locations in a direct-spray zone can lead to moisture problems and potential code violations.
"We recommend putting electrical tape on the quick disconnect after wiring it, so that debris doesn’t get on it during the remodel. Tom Jung – ThunderBunnyCo owner.
In areas like vanities or spots with indirect water spray, IP65-rated fixtures are sufficient. These are dust-tight and can withstand low-pressure water jets. For shower niches or areas with direct exposure, go for IP67-rated products, which are designed to handle temporary submersion up to about 1 meter (3.3 feet) for 30 minutes. Thunder Bunny’s shower niche LED kits are a great example – they’re built specifically for wet-area use with waterproof strips.
Cutting, Connecting, and Routing LED Strips
Precision matters when cutting LED strips. Straying even slightly from the marked cut points can break the circuit, leaving sections of the strip unusable. Always cut at the designated copper pads to keep the circuit intact.
"" – Tom Jung – ThunderBunnyCo Owner
For connections, solderless clip-on connectors are convenient for dry areas and quick fixes. However, soldering is more reliable in wet or high-power setups. If soldering, trim at the copper pad, pre-tin both the wire ends and the pad, then join them and secure the connection with heat-shrink tubing. For sharp corners, use solderless L-connectors or solder small wire jumpers between segments.
On longer runs, power the strip from both ends or add LED amplifiers at intervals to maintain consistent brightness.
Adhesion, Mounting, and Heat Management
Weak adhesion can ruin the look and reliability of your installation. Factory adhesive often isn’t strong enough, especially on textured surfaces. Clean the mounting area with isopropyl alcohol to remove dust and grease, then reinforce the setup with mounting clips or aluminum channels. These channels not only secure the strips but also act as heat sinks, extending the LEDs’ lifespan by up to 50%.
"We recommend using clips on the channels instead of adhesive to reinforce it. It saves clients from future issues." – Tom Jung – ThunderBunnyCo Owner
Controls, Dimming, and Color Consistency
Flickering is often a sign of dimmer compatibility issues. If you’re using a standard Triac wall dimmer, make sure your power supply is triac-dimmable. For quieter and smoother dimming in homes, ELV dimmers are a better choice. Using mismatched dimmers can lead to flickering and shorten the lifespan of your components.
Color inconsistency, especially in RGB systems, is usually due to wiring errors. In a four-pin RGB setup, three pins control the individual color channels, while one is the common connection. A single misplaced wire can throw off the color balance, so double-check polarity at every connection point.
Final Installation Checklist
Before wrapping up the job, take a moment to go through these checks. It’s much easier to fix a loose connection or a mismatched component now than to deal with issues after the tile is set or the drywall is closed.
Start with specification checks. Make sure the LED strip voltage (12V or 24V) matches the power supply output exactly. Also, confirm that the power supply is loaded to no more than 80% of its rated wattage.
For bathroom and shower niche installations, double-check that the fixture has a UL Listed rating for the entire assembly (not just "UL Recognized" for individual components) and is marked for wet locations according to NEC 410.10(A). For vanity areas, an IP65 rating is the minimum, while inside shower niches, IP67 or higher is required. Thunder Bunny’s shower niche LED kits are designed to meet wet-location standards right out of the box.
Building on earlier system configuration and moisture protection steps, use the table below to confirm the key parameters before finalizing any bathroom LED setup:
| Parameter | Requirement | Why It Matters |
|---|---|---|
| IP Rating | IP65 minimum; IP67+ for shower niches | Protects against moisture damage in wet zones |
| Power Supply Load | Max 80% of rated wattage | Prevents overheating and driver failure |
| Voltage Match | Strip voltage = power supply output | Avoids immediate failure or fire risk |
| Terminal Torque | 8–10 in-lbs | Prevents arcing and stress on the circuit board |
| Max Voltage Drop | 3% | Ensures consistent brightness across the run |
| Conductor Type | THWN-2 for wet locations | Meets NEC 310.10 requirements |
Once these parameters are confirmed, proceed with a full system test.
Before securing anything permanently, power up the entire system and check for any flickering, uneven brightness, or color inconsistencies. Use a multimeter to measure the output voltage under load. If the voltage drops below the rated value, it could indicate an undersized power supply. For longer runs, walk the entire length and watch for dimming at the far end – this is often a sign of voltage drop.
If everything checks out, seal all LED channels in wet areas with neutral-cure (non-acidic) silicone to protect the components from corrosion. Mount drivers and controllers in easily accessible spots, like inside a vanity or closet, to simplify future maintenance. Finally, document the dimmer and controller settings to ensure warranty compliance.
Conclusion
Most LED kit installation problems stem from a few common, avoidable mistakes – things like voltage mismatches, improper moisture ratings, weak adhesion, or using incompatible components. When these issues are tackled head-on, you can achieve a system that runs smoothly and lasts 25,000 to 50,000 hours.
"If you have questions, we are here to help" Tom Jung – ThunderBunnyCo Owner
This highlights the importance of following a proper installation process. Steps like ensuring voltage compatibility, using aluminum channels for heat management, protecting against moisture, and thoroughly testing before sealing can eliminate most risks before they escalate on the job site.
For bathroom installations, pre-engineered solutions can make the job much easier. Our kits simplify the process by providing pre-assembled shower niche LED kits. These include silicone-encapsulated strips, integrated aluminum channels, and pre-matched components, saving time and reducing the chance of errors. Plus, our 2-year warranty offers extra peace of mind for contractors looking for dependable results.
"We keep it simple. Our system is designed for both contractors and DIYers, easy to install without sacrificing quality or finish." – Tom Jung
FAQs
How do I calculate the right power supply size for my LED strip run?
To determine the right power supply for your LED strips, start by calculating the total wattage required. Multiply the wattage per foot (found in the product specifications) by the total length of the strip. Then, add an extra 20-30% to ensure reliable performance and prevent overloading.
For instance, if you have a 10-foot LED strip that uses 5.5 watts per foot, the calculation would look like this:
- 10 feet × 5.5 watts/foot = 55 watts
- Adding 20-30%: 55 watts × 1.2 to 1.3 = 66 to 71.5 watts
In this case, you’d need a power supply rated for at least 66 watts. Also, make sure the voltage of the power supply matches the voltage of your LED strip, whether it’s 12V or 24V. This step is crucial for proper operation and safety.
Where should I place the driver and controller for easy servicing later?
For hassle-free upkeep, position the driver and controller in spots that are easy to access, like a dedicated junction box or a location close to the LED setup. This makes troubleshooting or repairs straightforward without needing to disassemble other parts of the system. Choosing the right placement helps prevent unnecessary headaches when maintenance is needed.
What’s the best way to troubleshoot dim or uneven brightness at the far end?
If your LED lighting looks dim or uneven, especially toward the far end of the strip, start by checking the power supply. Make sure it’s delivering enough power to support the entire strip and isn’t malfunctioning. A failing power supply can lead to inconsistent brightness.
Next, take a close look at the wiring. Ensure all connections are secure and inspect for any damage, particularly at connection points. Loose or damaged wires can disrupt the flow of electricity, causing uneven lighting.
Still having issues? Use a voltmeter to test the power supply. If it’s not maintaining consistent voltage, consider replacing it with a higher-capacity unit. This can help ensure steady power delivery and even brightness across the entire strip. If you purchased a kit from us, call or text us at (817) 841-9839 or email us at info@thunderbunnyco.com. We are real people and here to help!
Related Blog Posts